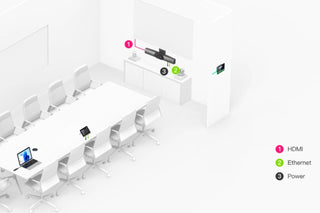
Yealink video conferencing system installation is generally quite user-friendly, but installation steps may differ for different models and versions. However, you can find a basic installation guide below. Beforehand, make sure all the components of your system are out of the box and nothing is missing.
Hardware Setup
- Connect the Device to Power: Connect the Yealink video conferencing device to a power source.
- Display Connection: Connect the device to a monitor or TV screen using an HDMI cable.
- Internet Connection: Connect the device to an internet source with an Ethernet cable. In wireless models, you can also connect via Wi-Fi.
- Camera and Microphone: If a separate camera or microphone is to be used, connect these devices to the relevant ports.
- On/Off: Turn on the device.
Software and Settings
- First Startup: When you turn on the device for the first time, you may be asked to make some basic configurations such as language selection and date/time settings.
- Log In: To log in to the device's web interface, enter the IP address in a web browser and log in. The default password is usually "admin".
- Network Settings: From the "Network" or "Network Settings" menu, make sure that the device is connected to the internet and the necessary settings are made.
- Compatibility Check: Check whether the device is compatible with the video conferencing software you use (Zoom, Teams, etc.).
- Updates: Update the device software, if applicable.
Testing
- Self-Test: There will usually be a 'self-test' option in the device's menu. With this option, check whether components such as camera, microphone and speakers are working.
- Call Test: Test audio and video quality by making a simple call.
Final Steps
- Advanced Settings: For advanced users, customizations such as screen layout, image quality, encryption and more can be made.
- User Training: Provide training to people who will use the system on basic features and usage.
If you run into any issues during installation, Yealink's customer support will usually be quite helpful. Additionally, user guides and online support can be very helpful.


